Field |
Description |
Account |
Account
Status |
Displays
the account status.
Active:
When the Panel is connected, registered, and associated with
AlarmNet 360. Inactive:
When the Panel is not connected and registered. |
Account
# |
Displays
the account number. |
Last
Registered |
Displays the
date when the panel was last registered with AlarmNet 360. |
Sync
Precedence |
Displays
the synchronization precedence between panel and the AlarmNet
360. |
Central
Station |
Displays the
location name of the Central Station. |
Active
Since |
Displays the
date since when the account was active. |
EULA
Acceptance |
Displays
the acceptance status and the date and time when the end-user
licence agreement was accepted. |
Dealer |
Displays
the dealer name. |
Alarm
Reporting Number |
Displays
the alarm reporting number. |
Location |
Location
Name |
Displays the
location of the device. |
Dealer
Reference ID |
Displays
the reference ID assigned to the dealer. |
Sold By |
Displays
the name of the sales person. |
Installed
By |
Select
installer from the drop-down menu/type the name if not listed
in the drop down. |
Contract End
Date |
Displays
the  icon to set the contract end
date by selecting the month, year, and date in the calendar. icon to set the contract end
date by selecting the month, year, and date in the calendar. |
Address |
Displays the
complete address of the customer. |
Notes |
You can enter
any notes for reference, any time later. |
Edit |
Click to modify
an existing account. |
Packages |
Package
Selection |
Select the
required package from the drop-down menu. Following are the packages
available:
Security Smart Security Smart Home |
Security |
The Security
package contains the following features:
|
Smart
Security |
Following
are the features available in Smart Security package:
Note: You
should have a TC account to avail all the features. |
Smart
Home |
The Smart
Home package contains the following features:
Alarm signaling Daily supervision APL (Advanced Protection Logic) Total Connect 2-Way Voice Automation (Lights, Locks, and Thermostats) Amazon Alexa voice control assistant
For more information on packages, Refer Package
Details.
Note: You
should have a TC account to avail all the features. |
Add-Ons |
This section
will have additional features depending on the selected package.
You can enable the required Add-Ons. |
Advanced
Protection Logic |
Select to
Enable additional assurance
that signals are sent to the Central Station in the event that
the alarm system equipment is compromised prior to sending an
alarm.
Designed to provide additional assurance
that an alarm is sent to the central station in the event
that the security system is compromised prior to it sending
an alarm. AlarmNet 360 receives all messages
upon violation of any Entry-Exit or dialer-delayed zones and
awaits a successful disarm from the user. If the network does not receive a
disarm within a certain time, AlarmNet 360 sends an alarm
to the Central Station.
Note:
By default, the Advanced Protection Logic (APL)
field for Lyric panels is always enabled and cannot be disabled. |
Two
Way Voice |
Select to
Enable two-way communication
between the control panel and the Central Station, following an
alarm condition.
Provides audio alarm verification
and remote listen-in capability. Allows central station to communicate
with the premises through AlarmNet 360. Requires a Cellular device that supports
2-way voice, and an 'AlarmNet 360 800+' central station
connection. Two-Way Voice over IP requires a L5200
or L7000, a WiFi board with Revision 4.97 or higher or a ILP5
and an 'AlarmNet 360 800+' central station connection.
Two-way communication between the control
panel and the Central Station will occur either through VoIP (using
Wi-Fi) or cellular (using SIM number).
Note:
When you are changing the service plan for two
way voice in a LYRIC panel,
you must ensure the following:
Set the precedence
to Alarmnet 360. Wait for 2 to 3
minutes until the panel sync is complete. You can find the
sync status under the Sync
option at the top right corner of the Account
Overview page. For example,
- Before
Sync
- Afters
Sync
|
Video
Alarm Verification |
Select to
enable Central Station to log on to the Total Connect camera and
verify the alarm credentials.
I-View
Now™ is a patented, cloud-based central station interface that
makes Video Alarm Verification as easy as pushing a button. Your
central station is integrated with I-View Now to offer Video Alarm
Verification. If you have any questions on I-View Now configuration,
please contact your central station.
Note:
This
feature is available only in Smart Security and Smart Home packages. |
Lyric
Lock |
Enable this
feature to password protect your panel. You should click Generate Validation Code and
enter the password in the panel to access.
Note:
This
feature is available only:
|
HomeKit |
Enable this
feature to receive the notifications in apple devices.
Note:
This
feature is available only for Lyric panels. |
Video
Doorbell Service |
Video doorbell
service enables end users to check doorbell activity on the Honeywell
Total Connect 2.0 app through an iOS device.
If you Enable
the video doorbell service, the following message appears
Does this customer have SkyBell
account? Based on the account availability,
select the relevant option and proceed. |
Video Service |
Based on
the selected service level, the video clip from the camera is
retained.
None:
Select to disable the video service. Disabling the video service
deletes all the video clips and you will no longer have access
to the video service module. 7
Days: Select to enable the video service for a maximum
of 7 days. The video service deletes the video clips that
are older than 7 days.
If
you have |
Features... |
IP
Camera |
|
HD
Camera |
|
If
you have |
Features... |
IP
Camera |
|
HD
Camera |
|
|
Panel |
Replace |
Appears at
the right corner of the Panel bar. The message Panel
is in replacement mode appears when the Panel is in the
replacement mode and also prior to the panel's association to
the device. |
Panel
Model |
Displays the
panel model type and name. |
MAC |
Displays
the MAC ID of the device. |
Firmware
Version |
Displays the
firmware version of the device.
Note:
The firmware version is visible only when all the
panel sync specifications are met. |
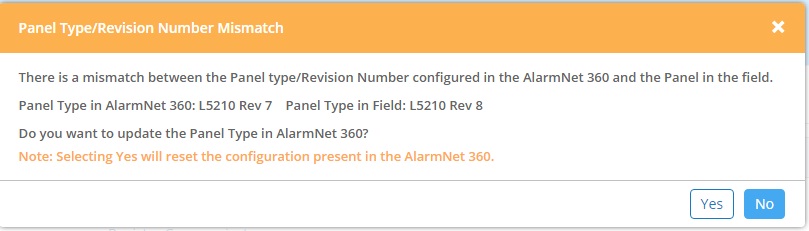
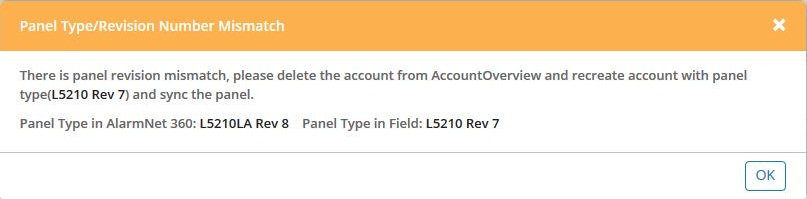
Revision |
Displays
the revision version of the panel. |
SiXTM
Device Firmware Details |
Displays the
count of all the configured RF devices, along with the count of
the device with the latest firmware.
Also, displays the link to view and upgrade
the device firmware details.
|
Communicator |
Status |
Displays
the status of the communicator.
Normal:
Appears when the communicator is connected. Not
Registered: Appears after creating the account and
before registering the communicator. Comm. Fail: Appears if there is network
connectivity issue or communicator connectivity issues. |
Last Status
Check-in |
Displays the
last status check-in date and time. |
Next Status
Check-in |
Displays the
next status check-in date and time. |
Wi-Fi/Ethernet
Communicator |
Displays the
details of the selected Wi-Fi/Ethernet communicator. |
MAC |
Displays
the MAC ID of the Wi-Fi communicator. |
Model Name |
Displays the
model name of the Wi-Fi communicator. |
Cellular Communicator |
Displays the
details of the selected cellular communicator. |
AID |
Displays
the AID number of the cellular communicator. |
Model Name |
Displays the
model name of the cellular communicator. |
Add |
Click to
add a cellular module.
During the account creation, you must add
a communicator. It can either be a IP
or Cellular communicator
or either the combination of IP
and Cellular communicator.
The following table displays the various combinations.
If
you have |
Then the... |
Created
the account using IP
communicator |
Panel’s
communication path is IP.
Account identity is based on IP
MAC. |
Created
the account using Cellular
communicator |
Panel’s
communication path is Cellular.
Account identity is based on Cellular
MAC. |
Created
the account using both Cellular
and IP communicator |
Panel’s
communication path is primarily on IP.
During IP communication
failure, Cellular
becomes the panel’s communication path. Account identity
is based on Cellular
MAC. |
Note:
If you have a Lyric account and you are trying
to add or remove a cellular communicator (secondary communicator),
you must follow the instructions available on the panel touch
screen. You cannot perform any programming activities through
the AlarmNet 360 application.
When you are editing the account, the following
table displays the various combinations.
If
the account has |
Then... |
Only
IP communicator |
When
you add a Cellular
communicator, the panel’s communication path is primarily
on IP. During
IP communication
failure, Cellular
becomes the panel's communication path. Account identity
is based on Cellular
MAC. |
Only Cellular
communicator |
When you
add a IP communicator,
the panel’s communication path is primarily on IP.
During IP communication
failure, Cellular
becomes the panel’s communication path. Account identity
is based on Cellular
MAC. |
|
System Summary |
Displays the count
of the following:
Users Sensors Keyfobs Keypads
You can click on each to access them. |